If you want your website to reach as many people as possible, you’ll need to translate it into multiple languages. A multi-lingual WordPress site can help you grow your traffic and reach new audiences. However, you may not have the time or resources to translate each and every page on your website.
Fortunately, a multi-lingual plugin can do all the woxrk for you! This tool will help you translate every element of your site and make it easy for visitors to switch between languages. All of this without needing to create multiple versions of each page manually and adding complex geolocation rules.
In this article, we’ll take a closer look at how multi-lingual websites work and introduce you to some of the best plugins you can use. Then, we’ll show you how to create a multi-lingual site. Let’s get started!
How Multi-Lingual Sites Work (And Which Plugins to Use)
Multi-lingual websites are sites available in multiple languages. They enable users to switch between languages using buttons.
Ideally, all of the site’s content should be fully translated. This includes text, images, navigation menus, widgets, and any other element you can think of:

Each version of the site uses a different subdomain or subdirectory. If you’re doing everything right, translated versions of your website should appear in search engine results for users in other countries.
From a technical standpoint, translating a full website can be a challenge. That’s why we recommend using WordPress translation or multi-lingual plugins.
Some of our top picks include:
- WPML. With this plugin, you can choose between machine and manual translations for your website. The company behind the plugin can also connect you with professional translators.
- Weglot. This is a third-party service that connects to your WordPress website using a plugin. It enables you to use machine translation for as many languages as you need.
- Polylang. This plugin lets you create multiple versions of pages, posts, and images in different languages. You can edit these pages using the WordPress editor and translate their content manually.
When choosing your plugin, you’ll want to consider the translation method you wish to employ. For example, Weglot is perfect if you want to use machine translation. Meanwhile, Polylang is great for manual translation and WPML strikes a good balance between both options.
How to Create a Multi-Lingual WordPress Site (in 2 Steps)
In this tutorial, we’ll show you how to create a multi-lingual WordPress website using WPML. To get started, you’ll need to install and activate the plugin.
Step 1: Add Languages and Choose Your Site’s URL Structure
After you install WPML, the plugin will launch a configuration wizard. First, it will ask you to choose the languages that you want to make your website available in:
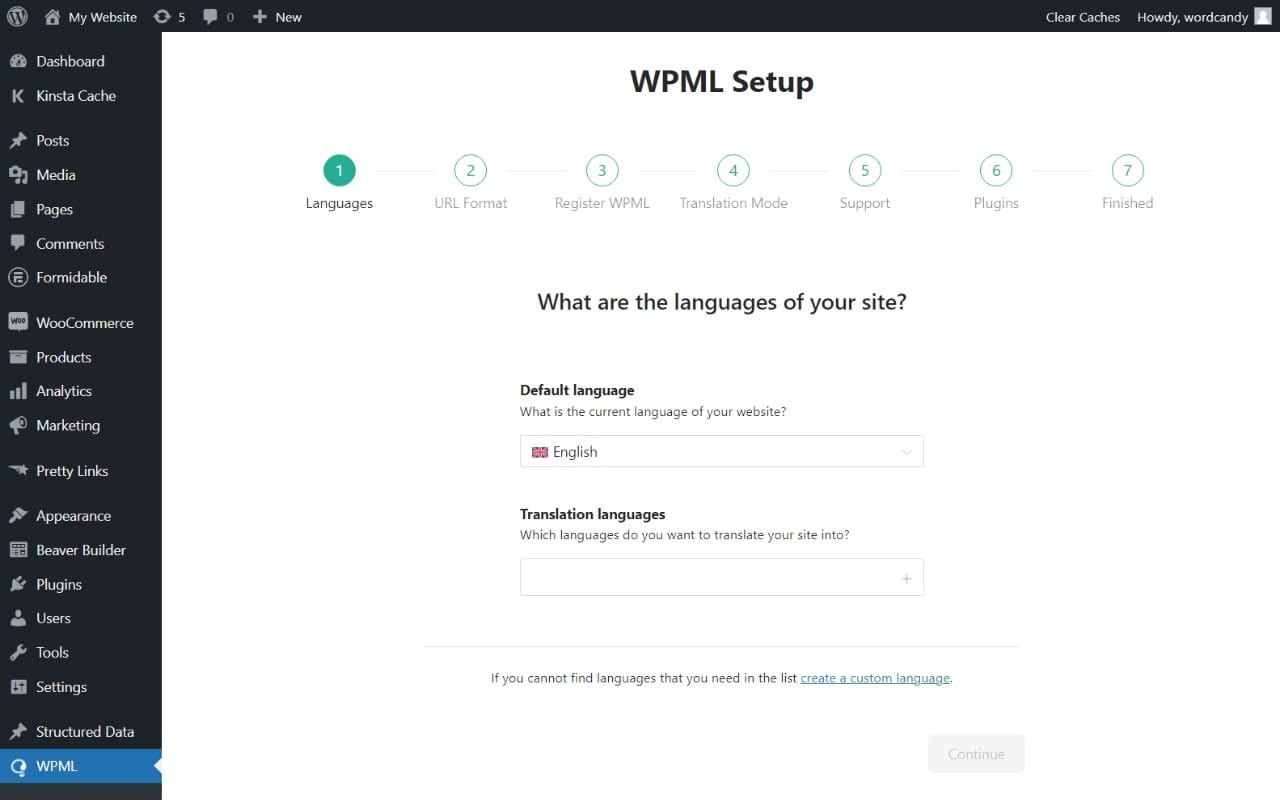
After you select the languages, click on Continue. You’ll then need to select the URL structure you want to use. You can choose to set up different languages in subdirectories or use different domains for each language. Additionally, you can add languages as URL parameters:
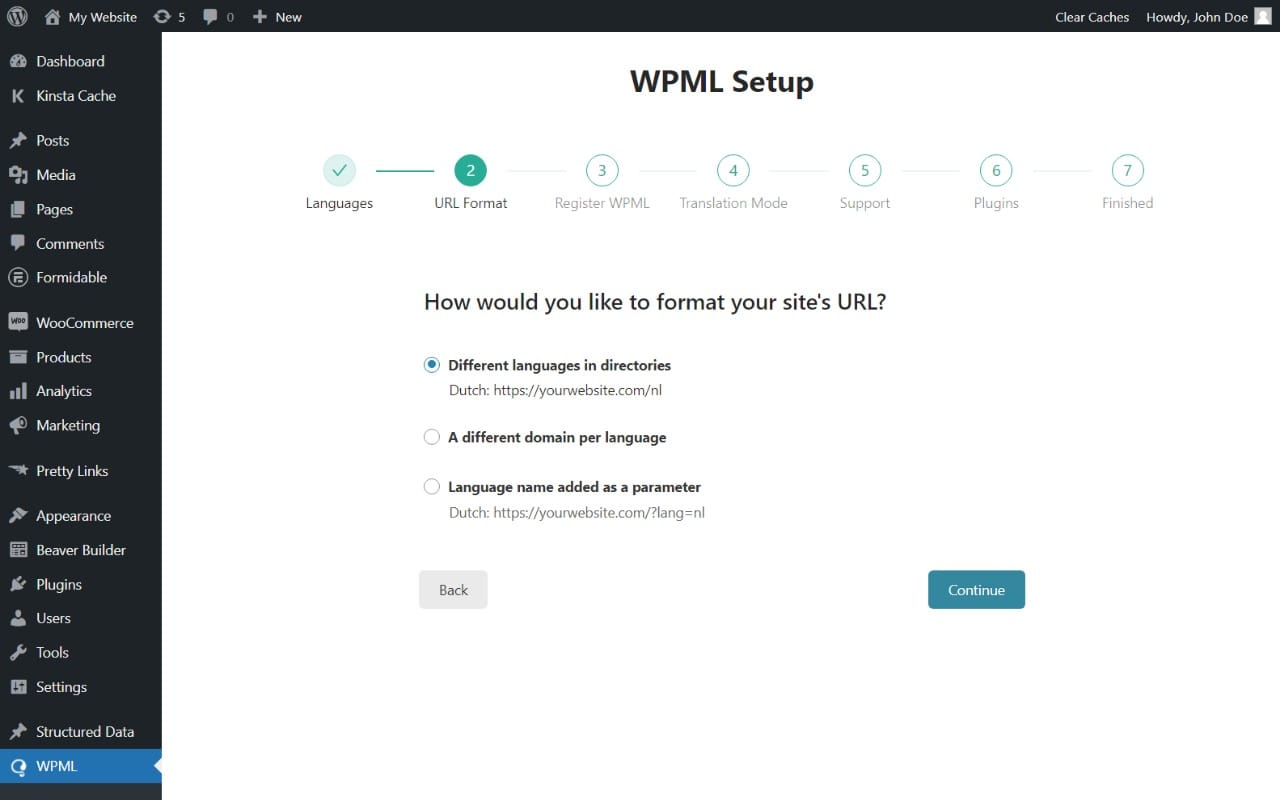
Using a different domain for each language can be overkill. We recommend you opt for either subdirectories or URL parameters. Both options are valid and your site will work the same regardless of which option you choose.
Next, the plugin will ask you to enter the site key you got from your WPML account. This will enable you to start translating your website.
After that, you can choose the type of translation you want to use. The main options are machine (or automated) translation and a manual approach:
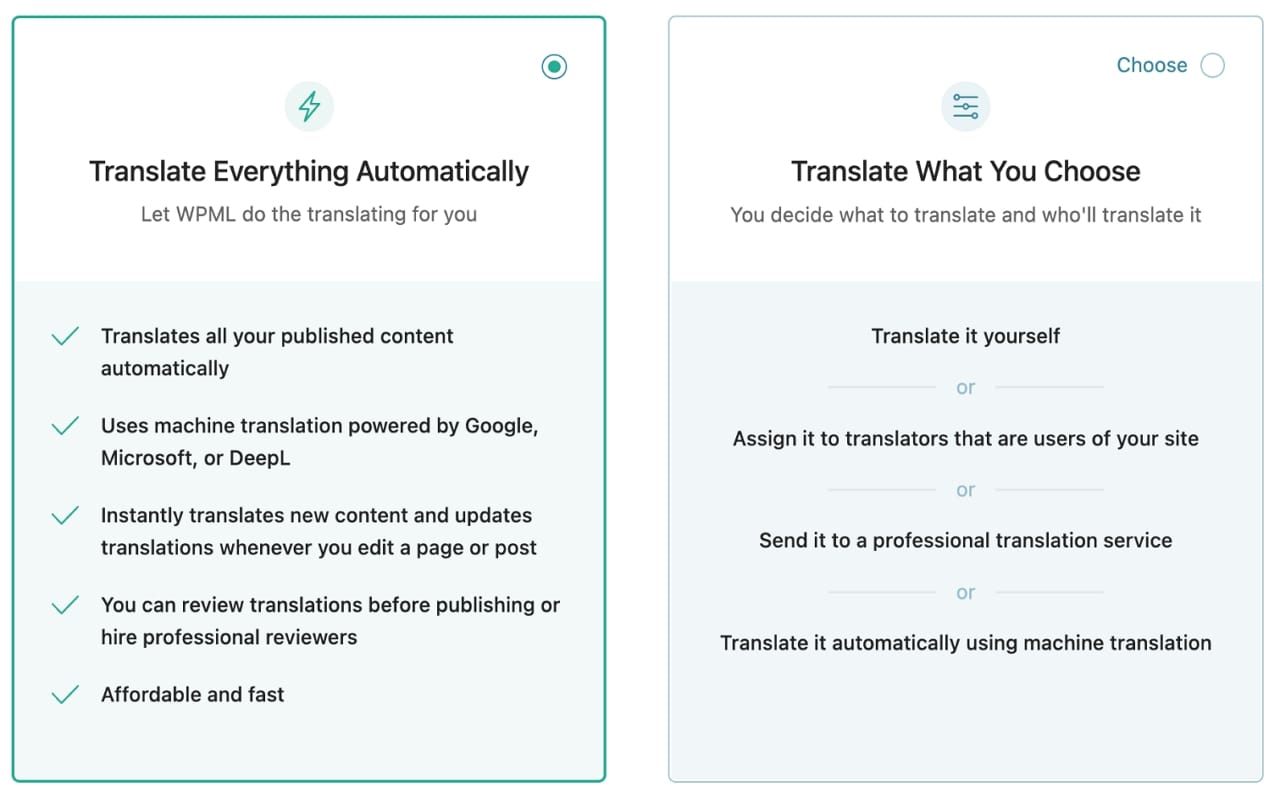
By default, WMPL recommends that you use machine translation. This is powered by either Google, Microsoft, or DeepL, depending on your choice.
If you choose this translation mode, WPML will do everything for you and you can review translations to make sure they’re accurate.
For this tutorial, we’ll opt for the manual approach. Let’s look at how that works.
Step 2: Translate Your Site’s Content
This step may take a long time depending on how much content you need to translate. To translate a page or post, go to Posts or Pages and look for the entry you want to work on.
Locate the plus icons next to the title name. There should be one for each language that you added to your site:
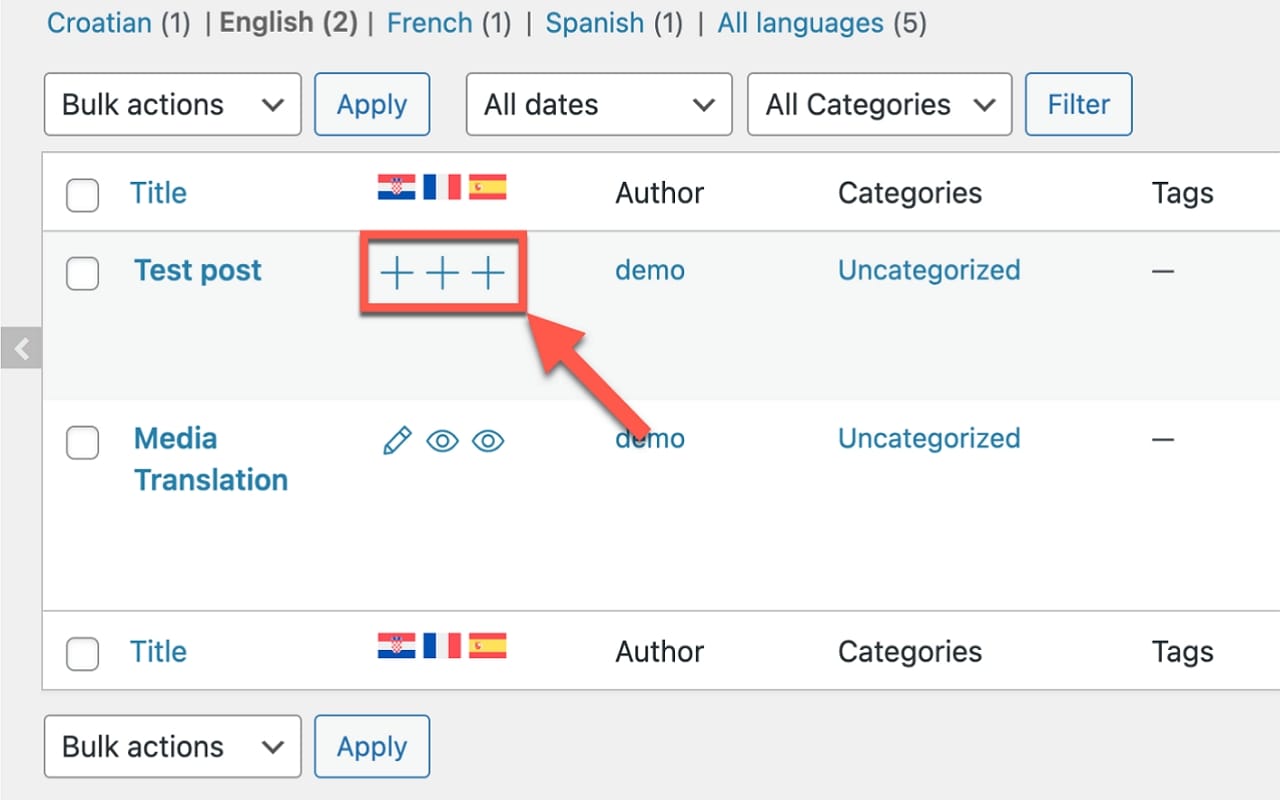
Image source: WPML.org
The translation process will depend on the type of WPML license that you have. A Multilingual Blog license gives you access to standard translation controls, whereas a Multilingual CMS license enables you to use the Advanced Translation Editor.
If you have access to the Advanced Translation Editor, you’ll need to click on one of these plus signs to launch it. The editor contains each of the page’s strings in its own line. You can choose any string and add a translation next to it:
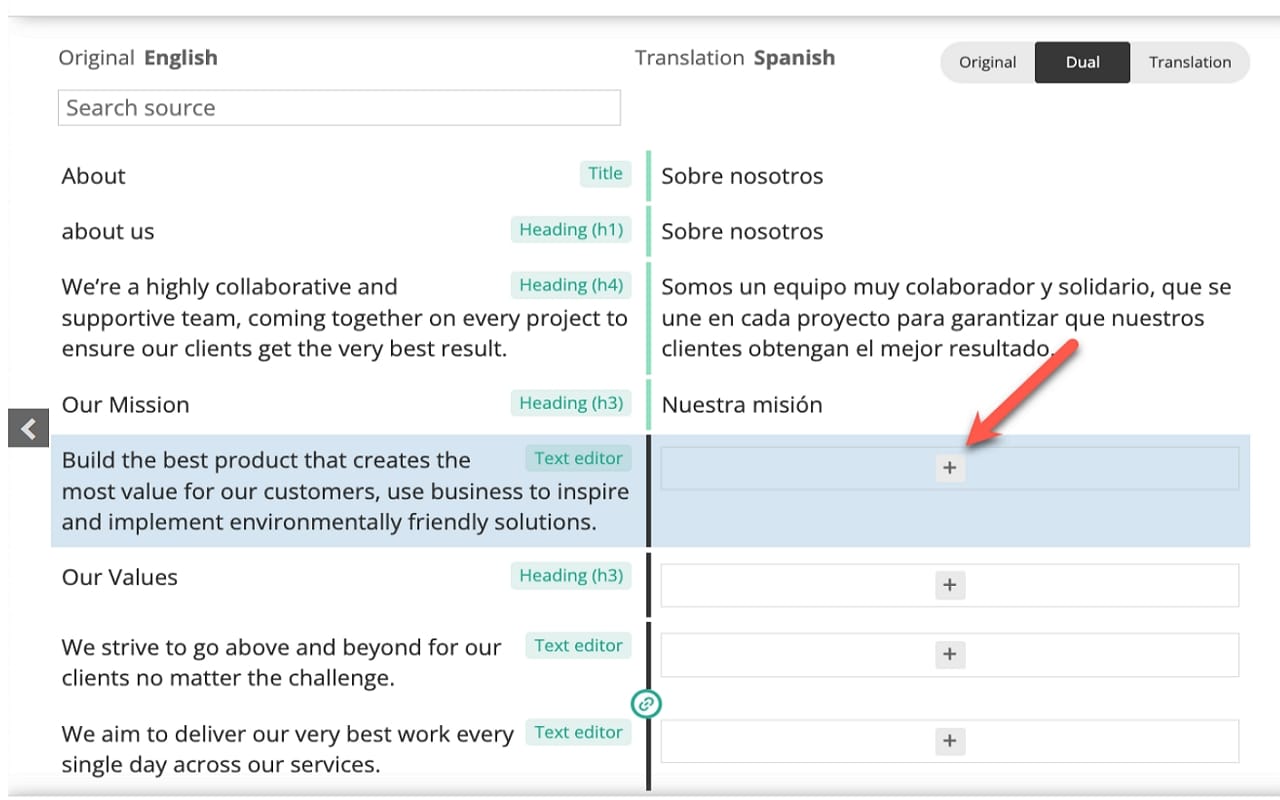
Image source: WPML.org
If you have a Multilingual Blog license, WPML will launch the Block Editor. You can then recreate the page or post in the language that you want, but the entire process is manual.
Whichever method you choose, you’ll want to make sure that you save your work every few minutes. When you’re ready, you can go ahead and publish your translated pages.
If you have a lot of content to work on, you may want to hire a professional translator. This will also help you ensure that the translated text is accurate.
Conclusion
Creating a multilingual WordPress site can be easier than you might think. With the right plugin, you can easily translate every post or page on your site – or even hire someone to do it for you!
If you’re opting for manual translation, we recommend WPML. Using this plugin, you can create a multi-lingual site in only two steps:
- Add languages and choose your site’s URL structure.
- Translate your site’s content, one string at a time.
Do you have any questions about how to create a multi-lingual WordPress site? Let us know in the comments section below!
